Why we started this idea????

A passion for food, wine, friends and entertaining is a big part of our life. This is a way for us to document our experiences, passion for food & life and also share it with others.


Monday, March 21, 2016

Salmon Wellington


Don't you just love beef wellington, right! It's decadent, special, not your everyday kind of dish. It makes for a great holiday menu or a treat for a dinner party. But beef wellington isn't exactly a spring type of dish, by nature it's just a bit heavy.
 
But salmon wellington now that's a more appropriate spring time dish.
 
We were in the mood for something a little special, a little different so salmon wellington it became.
 
 
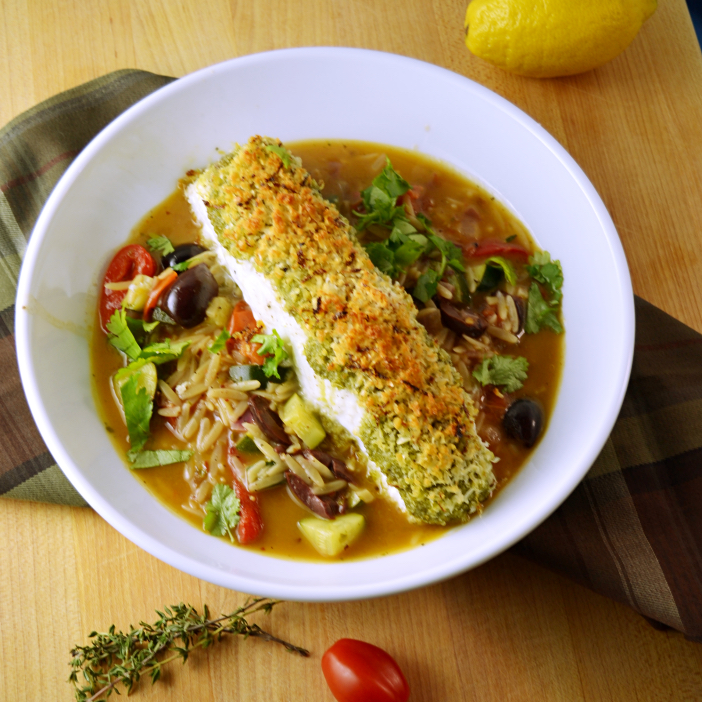
We found a great recipe posted from Seattle Fish Company that caught our eye. Puffed pastry wrapped around a salmon fillet topped with spinach and a crab salad. Oh yeah, we knew this needed to be made.
 
 
And don't be fooled it may look fancy and special but really it's not complicated at all to make.
 
 
Trust us you can lay down some puff pastry and layer salmon, spinach and crab.
 
Brush on some egg wash
and Voila, beautiful dinner you will have.
 
 
We enjoyed ours with a nice bottle of Washington 2013Viognier made by Cougar Crest. It was a good pairing because of it's light lime and honey essence paired with the rich salmon wrapped in puff pastry. We almost always stop by the Columbia Crest tasting room when we are staying in Spokane at the Davenport Hotel.


We did realize we could have cut the salmon fillets into even smaller portions as it was quite a rich dish and with the pastry pretty filling. We each only ate half of ours.
 
RECIPE:
 

Salmon Wellington with Spinach and Dungeness Crab - (Recipe from Seattle Fish Company)


Serves: 4 to 6

Ingredients

  • 1 2-3 lb King Salmon fillet, skin and pin bones removed (We used silver salmon)
  • 2 sheets of puff pastry, defrosted according to package instructions
  • 1 lb frozen chopped spinach, thawed ( we used fresh and steamed it)
  • 8 oz Dungeness Crab Meat, rinsed and picked through for any remaining shells
  • 3 tbsp mayonnaise
  • 2 tbsp minced shallots
  • 3 eggs, beaten
  • Salt and pepper to taste

Directions

  1. Pre-heat oven to 350 degrees F
  2. Remove excess moisture from the spinach by wrapping it in cheese cloth or a clean kitchen towel, and squeezing.
  3. Combine the crab, mayonnaise, shallots, salt and pepper in a bowl. Mix together and set aside
  4. Line a baking sheet with parchment paper. Lightly coat the parchment paper with non-stick cooking spray. place one rectangle of puff pastry out on it. Place the salmon fillet in the center of the puff pastry and top with the spinach. Spread the crab mixture over the top of the spinach evenly.
  5. Paint the puff pastry around the circumference of the salmon fillet with the beaten eggs. Top with the remaining piece of puff pastry and trim the excess dough from the package. Paint the top piece of puff pastry with the beaten eggs and crimp the edges of the top and bottom pieces of puff pastry to seal the salmon within.
  6. Cut decorative vents in the puff pastry approximately every 2-3 inches down the length of the package.
  7. You can use a cookie cutter to cut decorative pieces of puff pastry to place on top of your salmon Wellington prior to cooking if desired. Be sure to brush with egg wash prior to cooking.
  8. Place in pre heated oven for 30-35 minutes until puff pastry is golden brown. Remove and allow to stand before attempting to slice for serving.


Saturday, March 19, 2016

Chef's Cubano Sandwich


We must admit we do love the movie CHEF. We have watched it at least 10 times now. We love the focus on food, the music and the story of friends, family and the travels. It's just a perfect feel good kind of movie.

The movie inspired us to actually find the recipe for the Cubano sandwiches he made in his food truck, El Jefe. And we'll never regret it they are absolutely delicious. I found the recipe on the Bake Space Booknook Cafe App. 


We start first with making a delicious citrus & mint based mojo to marinate the pork in. It creates a crispy crust around the moist meat.


Sandwiched between the roll is a spread of Dijon mustard, sliced ham, Swiss cheese, pork roast and pickle slices. The pickles are key in this sandwich, don't skip this part. 

I really didn't think this sandwich would be my type of thing to be honest. I'm not really a mustard fan (essential to this sandwich, I mix mustard & mayo together to make the mustard tolerable for my tastes.) I'm not really even a huge sandwich fan in general. But we both agree this Cubano could make anyone a sandwich fan. 


Mojo Recipe:


Thursday, February 18, 2016

Grilled Mint Marinated Lamb chops with Mashed Cauliflower


We can't quite explain why with as much as we both love lamb how few and far between our lamb based meals are made around here. 

Lamb is relatively easily to find for us. Costco, which is a weekly stop for us, actually has delicious and inexpensive racks of lamb chops that make the the best grilled lamb lollipops. We give up? We just don't know why we don't make lamb enough. But we do know that when we do make it we enjoy it greatly. 


This recipe was one where after several weeks of strict Paleo eating we were a bit ready to change it up in order to keep on track. And these lamb chops and some much needed blue sky helped us get out there and get them on the grill. (And grilled lamb chops is by far our most fav way of cooking lamb.)


We adapted an epicurious recipe for grilled lemongrass marinated lamb chops. Mint is one of our preferred herbs with lamb so we made adjustments to the recipe. Switching out mint for the lemongrass was one of the main tweaks.

The lamb chops were perfect. It's important to not overcook lamb chops are they are thin and just don't taste nearly as scrumptious when not cooked medium rare. 


As we were following strict Paleo while making this recipe we made some mashed cauliflower with coconut milk and grilled asparagus to round out the meal. It was a flavor filled and delightful change up to our 30 day Whole Menu plan whether we were following Paleo or not.

RECIPE:

Grilled Mint Marinate Lamb Chops with Mashed Cauliflower

1 1/2 teaspoons cumin seeds, toasted and cooled
1-2 Cups fresh mint leaves 
1 large shallots, chopped (or 1/2 cup)
4 garlic cloves, chopped
1 1/2 tablespoons chopped peeled fresh ginger
1 1/2 tablespoons sugar
1 teaspoon salt
1/2 teaspoon turmeric
1/4 teaspoon cayenne
3 tablespoons water
1/4 cup plus 3 tablespoons vegetable oil
8 thin lamb chops cut into lollipops
1/4 teaspoon finely grated fresh lime zest
1 tablespoon fresh lime juice
1/2 cup small fresh basil leaves
1/4 cup small fresh mint leaves
1/4 cup fresh cilantro leaves


Finely grind cumin seeds in an electric coffee/spice grinder or with a mortar and pestle.
Roughly chop fresh mint leaves. Purée mint, shallots, garlic, ginger, cumin, sugar, salt, turmeric, cayenne, and water in a food processor, scraping down side occasionally, until as smooth as possible, about 2 minutes. (Paste will not be completely smooth.)

Pat lamb chops dry and rub mint paste all over them, then arrange in 1 layer in a 13- by 9-inch dish. Marinate, covered and chilled, at least 6 hours and up to 24 hours.

Prepare grill for cooking over direct heat with over gas or charcoal grill. Loosening lamb from grill with a metal spatula, turning over occasionally, and moving around on grill when flare-ups occur, 9 to 11 minutes total for medium-rare. (Some of mint paste will fall off.) Transfer chops to a platter and let stand, loosely covered with foil, 10 minutes. 

Whisk together lime zest and juice, remaining 1/4 cup oil, and salt and pepper to taste. Spoon over chops and sprinkle with herbs.

Mashed Cauliflower:
Steam 1 head cauliflower until cooked. Transfer cauliflower to blender or food processor. Add 1/2 - 3/4 Cup coconut milk to blender. Generously season with salt & pepper. Blend until smooth. 


Tuesday, February 2, 2016

White Pizza with Baked Eggs & Arugula Salad


Do you like eggs on your pizza? We definitely have become fans. We started first with our grilled pizzas and little baby quail eggs. It's a bit easier to control the temperature of your egg when they are smaller.

Our early version of Mole' Salami, Spinach and Quail Egg Pizza from a July 2011 post 

But over time we've obviously embraced the large chicken egg on our pizzas.

This recipe is actually a Blue Apron meal. We started having this meal service delivered over a year ago now. G had started graduate school commuting up to Seattle 2 nights a week and I had just taken over a new middle school principalship. We were in need with some dinner and grocery shopping help during the work week. Don't be confused clearly WE LOVE COOKING. Love spending hours researching the recipe we'll make and finding the ingredients to make it. But that's weekend cooking. Monday through Friday we are pretty much spent by the time we get home. So Blue Apron really met our needs. Not having to make decisions when we get home after making what feels like thousands of decisions a day is like a luxury during the week for us.


Each Saturday we have 3 meals delivered with fresh produce and meats and a very detailed recipe plan. We immediately put the meats in the freezer and the produce in the fridge's crisper bin. And then we are set for meals for most of the week. It works great for us. 

This recipe was right up G's alley with the baked eggs and the arugula salad.

RECIPE:


White Pizza with Baked Eggs and Arugula Salad
2 large eggs
Extra virgin olive oil
1 pound fresh plain pizza dough (found in most grocery stores now)
1/2 lb. fresh Mozzarella cheese -sliced
3 oz. Brussels Sprouts - ends cut off, and leaves pealed
2 cloves garlic, sliced
2 oz. arugula
1 lemon, zested, sliced in 1/2
1 red onion, thinly sliced (we only used 1/4 of the red onion for this)
1/2 C. ricotta cheese
1/2 Tsp red pepper flake (we used a bit more)

Preheat oven to 475 degrees. Lightly oil a pizza stone or sheet pan. Gently stretch the room temperature pizza dough onto the pizza stone or pan to 1/4 inch thick. Combine the ricotta cheese, lemon zest, the juice of 1/2 lemon and drizzle of olive oil and season with salt & pepper.

Spread the ricotta mixture onto the dough leaving a 1 inch border of dough. Top with the mozzarella cheese, garlic and sliced red onion sprinkled with red pepper flake. Bake 10-12 minutes or until cheese is slightly browned. Remove from the oven.

Create 2 wells in the center of the baked pizza and crack each egg into a well. Season eggs with salt & pepper. Bake the pizza again 5-7 minutes until the egg whites are set and yolks cooked to your preference. Remove from oven and let stand at least 2-3 minutes.

Mix the arugula with Brussels sprouts leaves with the other half of lemon squeezed , drizzle of olive oil and salt and pepper. Spread the arugula salad over the pizza. Top with red pepper flake. 

Sunday, January 24, 2016

Green Eggs & Bacon with Spinach Pesto


We are currently trying to get our health back on track and eating Paleo most of the time seems to work best for us to do this. And the reason we both believe Paleo works best for us is because when eating Paleo we never feel like we are dieting or missing out on great tasting foods. 

Some people find Paleo breakfast the most challenging especially if you are not a big egg eater. I have to admit prior to starting Paleo about 5 years ago, really the only kind of eggs I liked was scrambled or hard fried. 


Now any egg, any way makes the cut. We definitely eat a lot of eggs around here and we feel incredibly fortunate because a good family friend starting raising her own chickens a few years ago so now we get farm fresh, organic eggs delivered to our porch once a week. It's a great treat.

But we have found that mixing up how we prepare our eggs on the weekends really helps breakfast be something to look forward to. And this recipe, a play on green eggs & ham, was a great one to get us out of bed on a lazy Sunday morning. 

We first started by whipping up a quick spinach pesto. Now it's Paleo pesto so no parmesan cheese and walnuts instead of pine nuts but trust us you won't miss them and the drizzle of pesto over the eggs definitely brings a zesty addition to this dish.


We started by plating with a layer of spinach sautéed in coconut oil and garlic first. 


Followed with a layer of crispy bacon topped with two sunny side up fried eggs and then drizzled with our yummy spinach pesto. We added a few slices of avocado to balance out the textures.

This was a great and satisfying breakfast that met our Paleo parameters. Whether you are following a Paleo lifestyle or not we highly recommend this breakfast dish. It's likely you might even just have all of these ingredients in hand too, we did. 


Recipe:


Green Eggs & Bacon with Spinach Pesto

2 cups fresh spinach leaves, well-washed and stemmed
1⁄2 cup fresh basil
1⁄2 cup walnuts toasted
3 garlic cloves
2 tablespoons extra virgin olive oil
1⁄4 teaspoon sea salt
1⁄8 teaspoon fresh ground black pepper


Place all ingredients into food processor and process to a fine paste.
Taste and adjust seasonings and transfer to a glass container and top with a thin coat of olive oil to prevent the top of the pesto from discoloring.
Keeps for weeks in the refrigerator.

Monday, January 18, 2016

Parmesan - Crusted Halibut in Crazy Water


After what seems like weeks and weeks of heavy, not so healthy eating we decided not to calorie splurge for Sunday dinner this week which we usually do. During the work week we try to keep it relatively healthy, always for breakfast & lunch and mostly for dinners. But on the weekend we have  the time to cook and when we cook all day to make a meal it's usually not focused on being a healthy one. Just being honest.

But this past Sunday we both felt a need to keep it a bit lighter. We looked back in one of our favorite recipe resources, our collection of Cuisine at Home magazines (they are still one of the only cooking magazines we get that doesn't have their recipes available online.) We found a recipe we had marked as one we wanted to cook from a December 2008 issue that we had never got around to actually making. Perfect.

Parmesan-Crusted Halibut in Crazy Water with Zucchini, Tomatoes & Orzo sounded like a long title but absolutely right up our alley. We love halibut and the fact is in the winter we don't eat nearly enough of it. Crazy water sounded a bit interesting, after reading about the recipe we learned the recipe is based on an Italian recipe and it's called crazy water because the broth is made with wine, water, fragrant herbs, and veggies. Didn't sound too crazy for us. 


Luckily our favorite fish market nearby, Metropolitan Market, had some really good looking halibut. It was previously frozen given the time of the year but it looked and smelled about as fresh as we'd be able to find. 


The recipe starts with smearing the halibut with some store bought pesto (I also found some freshly made pesto at Met Market) and then creating a Parmesan and panko crust that goes on top of the pesto. 


Evidently to make the true Italian version of the recipe the halibut would poach in the "crazy water" but in order to keep the Parmesan crust crispy in this recipe we baked the halibut in the oven separately from the broth. And this absolutely was a great call. That crispy crust eaten with the savory, briny broth was fantastic.


It really was a deliciously, flavorful meal. All of the components played perfectly off each other; the kalamata olives, lemon juice, roasted red peppers contrasted with the crispy, pesto flavored sweet halibut. 


We enjoyed our wonderful Parmesan crusted halibut with an oaky  Walla Walla 2013 Waterbrook Reserve Chardonnay.


RECIPE:

Parmesan-Crusted Halibut in Crazy Water with Zucchini, Tomatoes & Orzo 


Makes 2 servings : Total Time about 45 minutes

Halibut:
1/4 C panko crumbs
2 Tblspns grated Parmesan cheese
Minced zest of 1/2 a lemon
Salt & Pepper to taste
4 tspns purchased pesto, divided
2 halibut fillets, 1-inch each (4 0z. each)

For the Crazy Water:
1/4 C minced red onion
1 tspn minced garlic
1/4 tspn red pepper flakes
2 tspns olive oil
1/4 C dry white wine
2 1/2 C water
1/2 C halved grape tomatoes
1/4 C dry orzo pasta
1 tspn sugar
2 sprigs fresh thyme
1/2 C coarsely chopped zucchini
1/2 C jarred roasted red pepper, cut into strips
1/4 C halved kalamata olives
2 Tspns chopped fresh parsley
Juice of 1/2 a lemon
Lemon wedges

Preheat oven to 450; coat a baking sheet with nonstick spray.

Combine panko, Parmesan, lemon zest, salt and pepper in a bowl. Spread 1/2 pesto on each piece of halibut and arrange on prepared baking sheet. Press panko mixture onto pesto side of halibut, spritz crumbs with nonstick spray, then refrigerate until ready to roast.

Saute onion, garlic, and pepper flakes in oil in a saucepan over medium-high heat for the 'crazy water.' Cook until soft, about 3 minutes, then deglaze with wine. Simmer until nearly evaporated, then stir in water, tomatoes, pasta, sugar, and thyme. Cook until orzo is tender, about 9 minutes.

Roast fish while orzo simmers. Cook fillets until crumbs are golden and flesh flakes easily with a fork, 10-12 minutes depending on the thickness of the fillets.

Add zucchini, red pepper strips, and olives to crazy water; simmer just until heated through. Off heat, stir in parsley, lemon juice, salt, and pepper to taste. To serve divide broth between 2 shallow bowls, top each with halibut fillet, and garnish with lemon wedges. 

Thursday, January 14, 2016

Our Favorite Chicken Tortilla Soup


When I've been sick a few days nothing sounds better than a bowl of hot & spicy soup. And for us there really is nothing more comforting than a good chicken tortilla soup. After 4 days of a sore throat, stuffy head and deep cough it was time to bring on this comfort and make some soup.

We just returned from Chicago where we spent 4 days eating, eating and eating some more. 

Frontera Grill's Bar
And visiting Rick Bayless's Frontera Grill is almost always a Chicago must visit for us. If you've frequented our posts you might know G is somewhat of a Rick Bayless fan and a lot of  our meals are inspired by his flavors. 

We make chicken tortilla soup several times a year. And each time we take a trip to Mexico we try as many different restaurants' tortilla soup as we can to build our palate so we can attempt to bring those same authentic flavors home to the soup we make. 


We've made many different versions of tortilla soup but Rick's process of toasting dried chiles and then frying them to reconstitute the flavor has become one of our favorites. This time we decided to mostly wing our own version of the soup but to definitely include his process for building the flavor of the broth with the toasted chiles.


Most recipes you find will call for you to fry strips of corn tortilla. We've adapted a "fryless" method to avoid both the mess frying and the extra calories that we never really need. 
We use a pizza cutter to cut thin strips of corn tortillas. 

Then place them on a sheet pan and bake them in a 350 degree oven. Tossing them every 5-8 minutes until they are browned & crispy. They provide the same crunch and texture in the soup that fried tortillas do.


We first de-seeded some dried chiles and toasted them in a dry pan on the stove. And then saute them with onions, serrano chile and garlic in olive oil before adding them with a can of fire roasted tomatoes in the blender to create a puree. 


Then we saute the chicken and put it aside and add the puree back to the dutch oven and reduce it until it's thick and rich and finally add the chicken stock.


Then we create our own bowls of soup with the variety of toppings. As they do in Mexico we always start first with the first layer in our bowl being a cubed, fresh, slow melting Mexican cheese like Queso Fresco or Panella. Then of course followed by chicken either cubed or shredded. 


This time we actually added some cooked lentils to add some additional protein and texture. 


We then add broth, chopped avocado, cilantro, tortilla strips and a squeeze of lime. Sometimes we'll also add Mexican crema but not always.

The toasting of chiles followed by sauteing them and pureeing them with the fire roasted tomatoes really does help build a great depth of flavor. This time I added 1 serrano chile as well to increase the spice since I was all stuffed up.


The lentils probably aren't authentic at all, at least we've never had them in a tortilla soup in Mexico, but since we've been making this for almost 15 years we are at a point that we are trying to create our own favorite version. This one might go on our the top 3 list.

Recipe:

Chicken Tortilla Soup

Makes 8-10 servings depending on serving size

Soup Ingredients:
2 dried pasilla ancho chiles (or whatever dried Mexican chiles you prefer really), seeds removed and torn into small pieces
1 can of fire-roasted tomatoes 
2 tablespoons extra virgin olive oil
1 medium onion, diced
6 garlic cloves, minced
1 minced serrano chile, seeds removed
8 cups chicken broth
sea salt
freshly ground black pepper
1/2 teaspoon chipotle powder (optional)
1 lb chicken breast, cut into small chunks
1 cup cooked lentils (optional)

Toppings:
fresh lime wedges
corn tortilla strips made from corn tortillas (see notes within the post)
1/2 cup cubed 
avocados (1-2), pit removed and diced
fresh cilantro leaves
Directions:

Toast the chiles in a dry skillet over medium heat) until they are soft and fragrant. Set aside on a cutting board to cool.

Saute diced onion, garlic, serrano and toasted chiles in olive oil until soft and translucent 5-6 minutes. 

Using a slotted spoon, transfer the cooked onion, chile and garlic to a blender with the can of fire roasted tomatoes and chiles. Puree all of the ingredients together until very smooth.

Cook chicken in dutch oven, season with salt, pepper and chipotle powder, when cooked through and set aside.

Return the soup pot to high heat. Once pot is very hot, add the pureed tomato chile mixture all at once--it should sizzle immediately. Continue to cook over high heat, stirring constantly, until the mixture thickens substantially--for about 5-6 minutes--once it is ready, it should resemble the thickness of a loose tomato paste.

Add the chicken broth to the pot and combine thoroughly using a spoon or whisk. Reduce the heat and allow the broth to simmer for 15-20 minutes. Season generously with salt and pepper to taste.

Over low heat, add the lentils and chicken. Stir occasionally until chicken is just cooked through (this should only take 2-3 minutes). Finish the soup with lime juice.
Serve hot with toppings (or alternatively, place toppings in empty bowls and pour soup directly over them).

Friday, January 8, 2016

Cheesy Shrimp & Grits


Hey, have you ever been scrolling through Twitter and see a delicious Cheesy Shrimp & Grits dish that a friend has posted and is eating that makes your mouth water? Well that's exactly how this dish came about. 

After seeing our friend's post we immediately knew we had to make this dish and make it tonight. We were out and about doing some errands but I googled some recipes and found one by Martha Stewart that we decided to give a try.  We pretty much had everything we needed to make it so we only had to pick up a lemon and some green onions.


The spicy shrimp were perfectly flavored and had just enough heat to make them wonderful. Our grits turned out a bit too lumpy and not as creamy as we'd of liked them to be but we can fix that by adding some more broth next time. 

This dish hit the spot.


RECIPE:

Cheesy Shrimp & Grits (adapted from Martha Stewart) 

Shrimp:
1 pound medium shrimp, peeled and deveined
4 tablespoons olive oil
1 teaspoon paprika
Pinch cayenne, pepper
Coarse salt and freshly ground pepper
1/2 cup finely chopped celery
1/2 cup finely chopped shallots
2 tablespoons red or green chiles, minced
1/4 cup dry white wine
1/3 cup homemade or store-bought low-sodium chicken stock
3 tablespoons unsalted butter, cut into 1-inch pieces
Juice of 1 lemon
Coarse salt and freshly ground pepper
Cheese Grits
1/2 cup cilantro leaves, coarsely chopped
1/4 cup thinly sliced scallions, green parts only, sliced on the bias
4 slices Maple-Glazed Bacon

DIRECTIONS

Place shrimp, 2 tablespoons olive oil, paprika, cayenne pepper, 1 teaspoon salt, and pinch of black pepper in a medium bowl; toss to combine.
Heat remaining 2 tablespoons olive oil in a large skillet over medium-high heat. Place shrimp, celery, shallots, and chiles in an even layer in skillet and let cook for 1 minute, without stirring. Turn shrimp and add wine; let reduce to 2 tablespoons, about 30 seconds. Add chicken broth and simmer until it begins to thicken, about 1 minute more. Stir in butter until completely melted; add lemon juice.
Divide grits evenly between 4 serving bowls; top with shrimp and sauce. Garnish with cilantro and scallions; top with a slice of maple bacon and serve.

Cheesy Grits 

2 cups stone-ground grits
2 cups homemade or store-bought low-sodium chicken stock, plus more as necessary
2 cups milk
1 cup grated sharp white cheddar cheese
1/4 cup grated Parmesan cheese
Coarse salt and freshly ground pepper

DIRECTIONS

Place grits in a large bowl; add 4 cups water; stir (light bran will rise to the top); and drain.
Bring chicken stock and milk to a boil in a medium saucepan over medium-high heat. When liquid begins to boil, slowly whisk in grits; cook, whisking constantly, for 1 minute. Reduce heat to medium-low and cover. Cook, stirring occasionally, until thickened, about 20 minutes.
Stir in both cheeses until melted and well combined. If grits seem a little too thick, add more stock to loosen. Season with salt and pepper and serve.

Sunday, January 3, 2016

Chicken Ramen with Crispy Chicken Skin


Lately we've developed a pretty healthy craving on a regular basis for a good homemade ramen. Yes, both of us individually as college students consumed our fair share of totally unhealthy packaged ramen dishes. It kind of makes me swell just thinking of it but what can we say those college days were lean.

We've tried a few different recipes with some mild satisfaction but really we learned making a good broth isn't a quick or super easy endeavor. 

We adapted a few different recipes we found to make the best ramen and broth we've made to date. We started with bone in, skin on chicken thighs. Both the bones and skin really add to the flavor of the broth so we feel this is what made all the difference with this ramen. 

Somewhat mistakenly the skin really stuck to the bottom of the pot and tore away from the chicken. The skin started getting all crispy and we both immediately thought that crispy skin will make a great topping and it did.

Once the chicken was cooked we removed the chicken from the pot and started our broth. Adding onion, ginger and garlic and chicken broth with some dashi seasoning. We also added a bit of soy sauce and sesame oil as well.

While the broth simmered for about 45 minutes we sauteed the broccolini and mushrooms, shredded the chicken and cooked the ramen. And soft boiled the eggs.


Now it was time to assemble the ramen. We started first plating the noodles.


Followed by the broccolini.


And then the mushrooms and chicken.


Finally the broth, eggs and toasted sesame seeds and crispy chicken skin. It was our first time actually making soft boiled eggs. I think they went a minute or two too long, next time we'll cook them a bit less. 

We can't emphasize enough how essential the crispy chicken skin became, we highly recommend using it. We also believe it was the remaining stuck skin at the bottom of the pot that really added the rich essence to the broth. 


Recipe:

Chicken Ramen with Crispy Chicken Skin

Broth:
2 Tblspns olive oil
1 lb. Bone in, skin on chicken thighs
1 white onion, chopped
Salt & pepper
3 Tblspns ginger, peeled and chopped
4 cloves garlic, minced 
4 cups chicken broth
2 Tblspns dashi powder
2 Tblspns soy sauce
2 Tblspns sesame oil

Toppings:
1/4 lb oyster mushrooms
1/4 lb shitake mushrooms
1/4 lb broccolini
4 green onions, diagonally chopped
2 eggs
2 packages ramen noodles
2 Tblspns toasted sesame seeds
Crispy chicken skin

Cook the seasoned chicken thighs in 2 tablespoons olive oil in a dutch oven. As the skin starts to cook pull the chicken away from the skin and let the skin crisp up. When chicken is cooked through remove from pot and finish crisping chicken skin. Pull out as much chicken skin as you can and drain on paper towel and season with salt. 

To pot add onion, ginger, garlic, broth, dashi, soy sauce and sesame oil. Bring to boil then lower temperature and simmer for 30-40 minutes.

While broth cooks saute' mushrooms and broccolini until down but not over cooked. Cook ramen and soft boil eggs.

To large bowls divide noodles. Top with veggies and chopped chicken. Divide broth. Top with eggs, crispy chicken skin and toasted sesame seeds.